
BrewPi and RaspberryPints on a single RaspberryPi
The below document is designed to assist Brewers unfamiliar with RaspberryPi / Linux and web servers. When you are directed to type a command you will see the exact text to type listed like this
cd /var/www/html
once the text/code is input press enter.
02 Jan 2017 – Recent Update: Adding “Tilt Hydrometer” (formerly Brewometer)
With the recent failure of the Beerbug due to corporate buyout and massive server failures I decided to make a switch to the Tilt Hydrometer. This wasn’t made lightly.
Because we have already setup our BrewPi and RaspberryPints servers and they are working well we need to find a way to simply incorporate the Tilt Hydrometer code into our setup. This is actually accomplished fairly easily with a few lines of code.
First it is critical to make sure we are running the latest version of BrewPi. (the 2 steps below are for BrewPi Spark owners, Arduino users you need to use the --ask appended on line 2, then choose legacy)
1. cd ~/brewpi-tools
2. sudo python updater.py
Now we will actually begin setting up the Tilt Hydrometer code.
3. cd /home/brewpi
4. sudo git clone https://github.com/sibowler/brewpi-brewometer.git
5. sudo apt-get install bluez python-bluez python-scipy python-numpy libcap2-bin
6. sudo setcap cap_net_raw+eip $(eval readlink -f `which python`)
7. python /brewpi-brewometer/tiltHydrometer-test/TiltHydrometerTest.py
8. cd brewpi-brewometer/brewpi-web/
9. cp index.php admin.php (this copy/pastes the index pages as the new admin page, due to Public/Admin setup; the goal is to replace the admin.php page [current] with this new page)
10. rm -r index.php (this deletes the index.php page from the Tilt additional code, so it won’t overwrite the current index.php page)
11. sudo cp -r * /var/www/html/BrewPi/ (This is because I am running 2 web servers and this is where BrewPi is at)
12. sudo chown -R www-data:www-data /var/www/html/BrewPi/
13. cd /home/brewpi/brewpi-brewometer/brewpi-script/
14. sudo cp -r * /home/brewpi/
15. sudo chown -R brewpi:brewpi /home/brewpi
16. sudo shutdown -r
If you ever make a change to the web settings and you aren’t seeing them…try this before getting frustrated:
sudo service apache2 restart It will restart your web services and should initiate your changes.
In order to bring in the items on the panel you have to start a new brew. I am currently waiting on my Tilt Hydrometer so I will update the steps if there are any additional needed to complete the process.
28 Nov 2016 – (Firmware 0.4.4 has been released)
Don’t forget to update your BrewPi via ssh’ing into your BrewPi and using the following command:
sudo python ~/brewpi-tools/updater.py
It will check to see if the updater script is updated and if it isn’t you will have to run the script again to actually run the update.
The update will not destroy any of your settings if you have previously followed this tutorial. But you WILL have to make sure to tell the updater the correct install directory when it asks…if you remember we installed it in the /var/www/html/BrewPi directory.
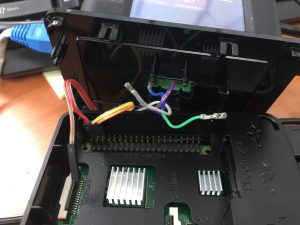
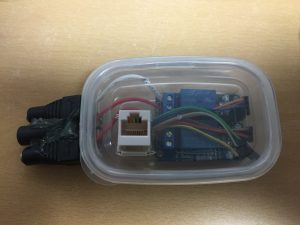
Wiring Quick Tips
Once you have everything ready with the software you will want to focus on streamlining the wiring. I chose RJ45 connectors so that I could and just length and make it easy to change location.
- Use Dupont Connectors and custom make your cables
- Get the Dupont connector adapters [plastic sleeves, for this you will need 3 pin (1) and 4 pin (1)]
- Get the Dupont connector pliers/crimpers
- Use RJ45 female connector ends (1 at the relay and 1 at the Raspberry Pi or BrewPi)
- Multi-colored Ribbon Cable
- Get a case and heat sync’s
Setting up the Raspberry PI – NOOBS Installation
- Download the latest NOOBS software https://www.raspberrypi.org/downloads/
- Click on NOOBS, to go to NOOBS page
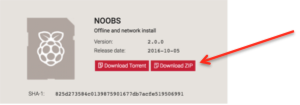
- In the NOOBS are click Download Zip (not NOOBS lite)
- Format your SD card, directions for your specific OS (Mac, Linux, Windows etc) can be found here:https://www.raspberrypi.org/documentation/installation/noobs.md
- Write the necessary files to your SD card, directions for your specific OS.
- Extract the zip file
- Copy all files (the ones inside the NOOBS_v_x_x_x folder, not the folder itself)
- Paste those files directly onto your SD card.
- Remove your SD card from your computer and put SD card into your Raspberry Pi.
- Connect keyboard, mouse, monitor/TV and ethernet cable your Raspberry Pi.
- Connect the power cable to boot your Raspberry Pi.
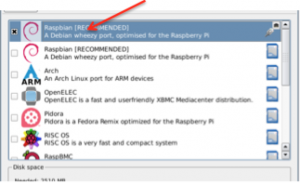
- Your RaspberryPi will boot and you will see an initial menu asking which software you want to install. Click Raspbian.
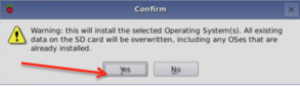
- A window may pop-up and ask you to confirm your selection. Click Yes.
- The installation may take 10 -15 minutes. You will see the Graphical (GUI) interface disappear to a terminal as the setup process finishes.
- On first boot I recommend that you change the Raspberry Pi This is done by clicking
- Click “OK”the Raspberry Pi logo (upper left) then choosing Preferences > Raspberry Pi Configuration. Click “Raspberry Pi Configuration”. Click the following and set your proper settings:

- System Tab
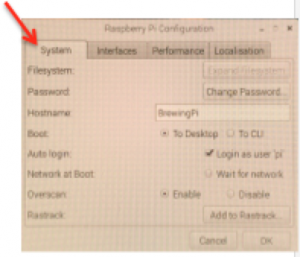
- Change User Password (do NOT keep the default
password, and don’t lose the new one) - Hostname (only change if you want a different name, recommended for multiple
Raspberry Pi’s)
- Change User Password (do NOT keep the default
- Localization Tab”
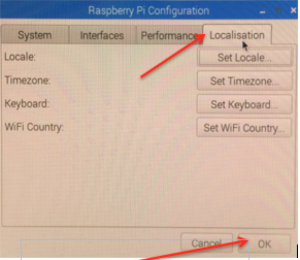
- Ensure Locale is correct, click “Set Locale…”
- Change Timezone (sets correct date/time)
- Set keyboard via “Set Keyboard
- WiFi country, set this to your country
- Click “OK”
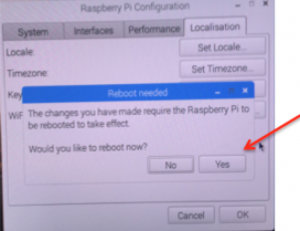
- System Tab
- A window will pop up telling you a reboot is required for the changes to take effect. “Would you like to reboot now?” Click “YES”
Raspberry Pints (Without Flow Meters) Install & Folder Structure
At this point forward you need to ensure you have your ethernet cable plugged in and you have nternet access. I recommend the cable (eth0)vs. wifi (wlan0) for all the steps until we get to the later portion setting up wifi and setting with wlan0 to have a static ip.
Installing packages & LAMP stack
- Using the RaspberryPi’s GUI open the web browser and enter in the following url: http://raspberrypints.com/download/ . This ensures that you have the latest version. This will download the files to your “Downloads” folder.
- Once download is complete close the browser window.
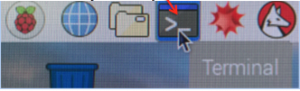
- Get to a terminal…
- If you are in the GUI (Operating System) click terminal (the icon is located on the top menu bar)
- If you are connecting via another computer you will need to ssh into (i.e. remote terminal control) the Raspberry Pi.
- Mac/Linux users simply open a terminal and type:
ssh pi@192.168.1.100Change 192.168.1.100 to your RaspberryPi’s ip address. Windows users will need to install software like PuTTY to ssh.You can find the ip address by logging into the GUI on your Raspberry Pi, opening a terminal and typingifconfigSince we are connecting via Ethernet it would be the address listed under eth0. - Enter the password that you selected when you updated the RaspberryPi configuration.
- Mac/Linux users simply open a terminal and type:
- If you are in the GUI (Operating System) click terminal (the icon is located on the top menu bar)
All commands going forward will be the same whether in terminal via GUI or ssh terminal.
sudo apt-get updatesudo apt-get upgradeAccept the default (hit enter) for any prompts that the terminal may ask you.- It should ask you if you want are sure you want to install x number Mb of data.
- Then you will be prompted to hit “(q to quit)” ….hit “q”
- Flask package configuration acknowledgement “ok” … hit Enter
- conf – hit Enter
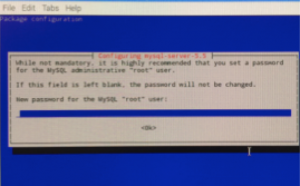
sudo apt-get –y install apache2 php5 mysql-client mysql-server php5-mysql phpmyadminThat installs the LAMP stack (6 packages) needed for Raspberry Pints.- You will be prompted to enter in a MySQL root user password DO NOT LOSE this password it is needed later to update your database (enter your beers).
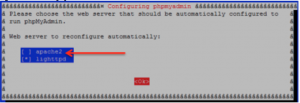
- You will also be asked which web server to reconfigure automatically CHOOSE apache2 simply hit “Enter”.
- A window for “Configuring phpmyadmin” will pop up informing you that a database must be installed before it can be used. It will ask if you want to “Configure database for phpmyadmin with dbconfig-common?” Ensure “<Yes>” is highlighted and hit “Enter”.

- You will once again be asked to create a password (and enter it twice) then you will have to enter it to continue (in total 3 password entries).
Preparing the Folder Structure
- From the open terminal:
sudo rm /var/www/html/index.html cd /home/pi/Downloadssudo unzip RaspberryPints-x.x.x..zipWhere “x.x.x” is the version number downloaded (in our case 2.0.1). You can cheat and simply begin typing Raspberry and hit the tab If what you have typed is unique the terminal will fill in the remaining information.cd /var/www/html(this is the current directory for ALL websites with this version, previous versions were located at /var/www which is why some help documents confuse people).sudo mkdir RaspPints(creating the Raspberry Pints directory)sudo mkdir BrewPi(creating the BrewPi directory)lsIf you have done everything correctly the “ls” command should have displayed 2 lines of text representing the 2 folders we just created
BrewPi RaspPints
Installation of Raspberry Pints into new folder structure
cd /home/pi/Downloadssudo mv RaspberryPints-2.0.1/* /var/www/html/RaspPintssudo chmod –R 777 /var/www/html/RaspPintssudo rm –r RaspberryPints-2.0.1(since we moved all contents of the RaspberryPints directory we now delete the folder to clean it up).
Raspberry Pints Configuration
- Open any web browser on your local network (can even use the Raspberry Pi’s browser)
- Type in your RaspberryPi’s ip address
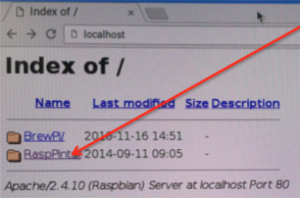
http://192.168.1.12if you are on your Raspberry Pi’s browser you can also type inlocalhostin the address bar. - Because we created 2 subdirectories (folders) that will represent each web site/server you will see two folders. Click on “RaspPints”.
- This will open the initial configuration page for Raspberry Pints. You need to fill out ALL text boxes PRIOR to clicking the “Setup” button.

*it is not recommended to change the Database Server unless you know exactly what you are doing.
- I chose not to load the sample data.
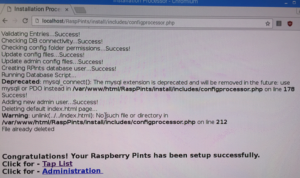
**KNOWN ISSUE POSSIBLE** you MAY receive an error which will more than likely mean that you will have to reboot and execute the installation setup page twice (steps 22-26). This does not always occur, but there is an easy fix.
The error:
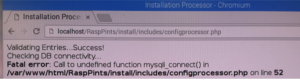
A successful installation should display the following “Congratulations! Your Raspberry Pints has been setup successfully.”
- Back in a terminal type
sudo rebootor simply use the GUI (Raspberry Pi menu) to reboot the Raspberry Pi. - Once again type in your Raspberry Pi’s ip address
http://192.168.1.12orlocalhost - Click on the “RaspPints” folder.
- Click on the “Your Logo Here” image in the top-left corner of the webpage to access the login page. Enter the username and password (the one from step 20 item 3 above) and click “Login”
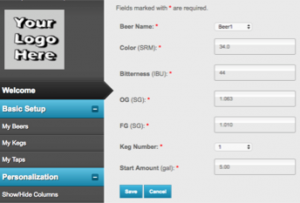
- Add each of you beers by clicking “My Beers” tab
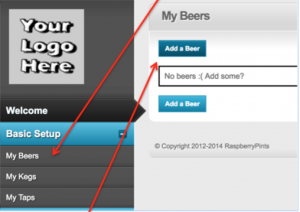
- Click on the “Add a Beer” button
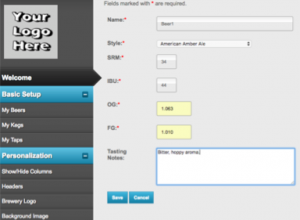
- Enter in your beer information, click “Save”. Repeat steps 31-33 until all your beers are entered.
- Add each of your kegs by clicking “My Kegs”
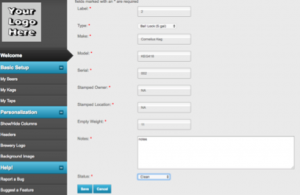
- Label – EXAMPLE: “1” (has to be a number, I started with 1)
- Type – I selected “Ball Lock (5 gal)”
- Make – EXAMPLE: “Cornelius Keg”
- Model – EXAMPLE: “KEG418”
- Serial – EXAMPLE: “001”
- Stamped Owner – EXAMPLE: “NA”
- Stamped Location – EXAMPLE: “NA”
- Empty Weight – EXAMPLE: “11”
- Notes – EXAMPLE: “purchased from xyzcompany on May 2016”
- Status – MAKE SURE that you list them as clean or they won’t be available to tap in the upcoming steps.
- Click “Save”
your kegs will then be displayed and updated with each entry
- Click “My Taps”
- Enter in your number of taps
- Click “Update Number of Taps”
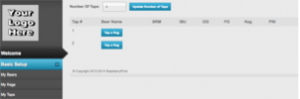
- Click “Tap a Keg”
- Select the beer you want on this tap
- Select the “Keg Number”
- Enter the “Start Amount” in gallons.
- Click “save”
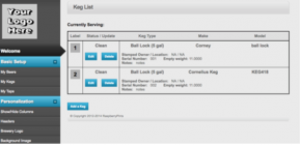
- Repeat for each beer you have on tap.*** there have been reported errors where the beer data doesn’t fill the text boxes when selected. If this occurs simply manually update the data.If completed correctly you should see a screen like this:
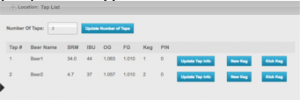
- Once again type in your Raspberry Pi’s ip address
http://192.168.1.12/RaspPints(if remote) or
localhost/RaspPints(on Raspberry Pi) and hit “Enter”.You should see your beers listed, something like the example below:

The Raspberry Pints installation is complete. Update other information like uploading your Brewery Logo and more.
BrewPi Install
Standard Software Installation (for BrewPi Spark v2)
- First we will need to download and install the BrewPi software, in a terminal type:
git clone https://github.com/BrewPi/brewpi-tools.git ~/brewpi-tools - Next we will install the downloaded files
sudo ~/brewpi-tools/install.sh - You will be asked to verify the correct time THIS IS CRITICAL; if your time is incorrect your data logged will be incorrect. If you have setup your Raspberry Pi configuration (as previously directed) you should simply hit enter.
- Next you will be prompted where to store the BrewPi python scripts. Click enter to accept the defaults, THIS IS NOT THE WEB INTERFACE, so click enter.
- Now you are asked where you want the BrewPi web files. You must change this location to the BrewPi folder we created earlier. Input:
/var/www/html/BrewPi
If you see more text that say “this directory doesn’t exist do you wish to create it” you have made a typo… go back to step 2.
- You will now be informed that your current cron entry differs from the latest version… hit enter
- You are asked to enable the cron entry… hit enter
- Once again you are informed that your current cron entry differs from the latest version… hit enter
At this point the normal configuration of BrewPi is installed. We are going to add in some extra features to make it more useable and remote friendly.
Test Preview – Basic Install Complete
You can now open a browser and type in the address of your Raspberry Pi (or use localhost if you are on the Raspbeery Pi) to ensure both sites are available.
- Type in your Pi’s ip and you will see 2 folders again.
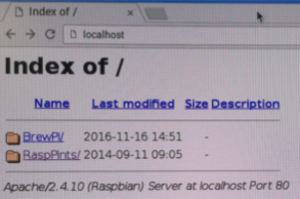
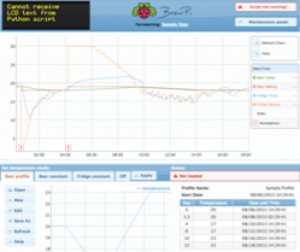
- Click the BrewPi folder and you should see this:
- Click the back button, then click the RaspPints folder and you should see this:

You now have verified that both services are up and running. Next we will walk through Public/Private (Admin) setup as well as setting up the web services to forward correctly to the service you want.
BrewPi Advanced Setup Options
Below are advanced topics and “lessons learned” while installing my setup and they should ensure that you have a more secure remote viewing setup and better ease of use.
Public Page & Admin Page Setup
These changes will allow you to safely share a public (non-admin) version of your BrewPi data and have a admin area with all the control functions. As with anything there are always security risks so please use the following at your own risk. The only way to be absolutely safe is to not share you network resources but what fun would that be?
- Go to your BrewPi web folder
cd /var/www/html/BrewPi - Now you will rename the index.php (the default webpage when you login) to admin.php (using the move command). This is because all of the control functions are on this page and we want to only let the admin have access to those.
sudo mv index.php admin.php - Now we need to create a new index.php page
- Copy the following code:
<?php/* Copyright 2012 BrewPi/Elco Jacobs.* This file is part of BrewPi. * BrewPi is free software: you can redistribute it and/or modify * it under the terms of the GNU General Public License as published by * the Free Software Foundation, either version 3 of the License, or * (at your option) any later version. * BrewPi is distributed in the hope that it will be useful, * but WITHOUT ANY WARRANTY; without even the implied warranty of * MERCHANTABILITY or FITNESS FOR A PARTICULAR PURPOSE. See the * GNU General Public License for more details. * You should have received a copy of the GNU General Public License * along with BrewPi. If not, see <http://www.gnu.org/licenses/>. */ // load default settings from file$defaultSettings = file_get_contents('defaultSettings.json'); if($defaultSettings == false){ die("Cannot open default settings file: defaultSettings.json"); } $settingsArray = json_decode(prepareJSON($defaultSettings), true); if(is_null($settingsArray)){ die("Cannot decode defaultSettings.json"); } // overwrite default settings with user settings if(file_exists('userSettings.json')){ $userSettings = file_get_contents('userSettings.json'); if($userSettings == false){ die("Error opening settings file userSettings.json"); } $userSettingsArray = json_decode(prepareJSON($userSettings), true); if(is_null($settingsArray)){ die("Cannot decode userSettings.json"); } foreach ($userSettingsArray as $key => $value) { $settingsArray[$key] = $userSettingsArray[$key]; } } $beerName = $settingsArray["beerName"]; $tempFormat = $settingsArray["tempFormat"]; $profileName = $settingsArray["profileName"]; $dateTimeFormat = $settingsArray["dateTimeFormat"]; $dateTimeFormatDisplay = $settingsArray["dateTimeFormatDisplay"]; function prepareJSON($input) { //This will convert ASCII/ISO-8859-1 to UTF-8. //Be careful with the third parameter (encoding detect list), because //if set wrong, some input encodings will get garbled (including UTF-8!) $input = mb_convert_encoding($input, 'UTF-8', 'ASCII,UTF-8,ISO-8859-1'); //Remove UTF-8 BOM if present, json_decode() does not like it. if(substr($input, 0, 3) == pack("CCC", 0xEF, 0xBB, 0xBF)) $input = substr($input, 3); return $input; } ?> <!DOCTYPE html ><html> <head> <meta http-equiv="content-type" content="text/html; charset=utf-8" /> <title>BrewPi reporting for duty!</title> <link type="text/css" href="css/redmond/jquery-ui-1.10.3.custom.css" rel="stylesheet" /> <link type="text/css" href="css/style.css" rel="stylesheet"/> </head> <body> <div id="beer-panel" class="ui-widget ui-widget-content ui-corner-all"> <?php include 'PublicBeerPanel.php'; ?></div> <!-- Load scripts after the body, so they don't block rendering of the page --> <!-- <script type="text/javascript" src="js/jquery-1.11.0.js"></script> --> <script type="text/javascript" src="js/jquery-1.11.0.min.js"></script> <script type="text/javascript" src="js/jquery-ui-1.10.3.custom.min.js"></script> <script type="text/javascript" src="js/jquery-ui-timepicker-addon.js"></script> <script type="text/javascript" src="js/spin.js"></script> <script type="text/javascript" src="js/dygraph-combined.js"></script> <script type="text/javascript"> // pass parameters to JavaScript window.tempFormat = <?php echo "'$tempFormat'" ?>; window.beerName = <?php echo "\"$beerName\""?>; window.profileName = <?php echo "\"$profileName\""?>; window.dateTimeFormat = <?php echo "\"$dateTimeFormat\""?>; window.dateTimeFormatDisplay = <?php echo "\"$dateTimeFormatDisplay\""?>; </script> <script type="text/javascript" src="js/main.js"></script> <script type="text/javascript" src="js/device-config.js"></script> <script type="text/javascript" src="js/control-panel.js"></script> <script type="text/javascript" src="js/maintenance-panel.js"></script> <script type="text/javascript" src="js/beer-chart.js"></script> <script type="text/javascript" src="js/profile-table.js"></script> </body> </html> - You now have to create a new index page.
sudo nano index.php - Paste the code you copied above into the terminal. NOTE: it will take a few seconds for the data to transfer, you should wait to see a “</html>” at the very bottom before moving onto the next step. Approximately 20 seconds.
- Press CTRL+X
- Press Y
- Press Enter
- Copy the following code:
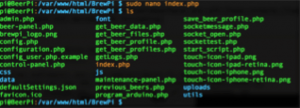
- Verify you have both admin.php and index.php pages in this directory by using the list “ls” command:
ls
- Now you need to create a new PublicBeerPanel.php page, which will be the public page (no admin buttons/controls).
- Copy the code on the following page (here is a link to file with just the text)
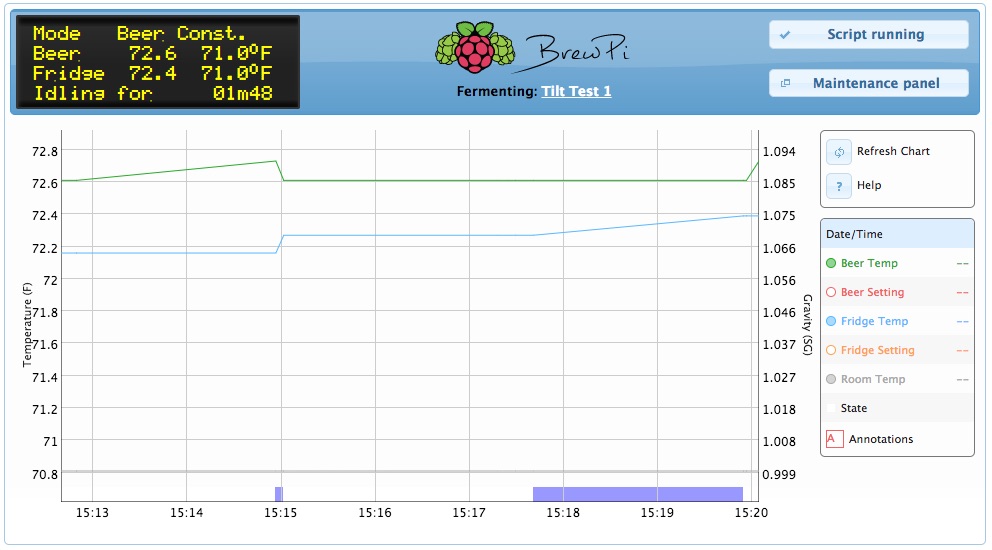
<?php
/* Copyright 2012 BrewPi/Elco Jacobs.
* This file is part of BrewPi.* BrewPi is free software: you can redistribute it and/or modify
* it under the terms of the GNU General Public License as published by
* the Free Software Foundation, either version 3 of the License, or
* (at your option) any later version.* BrewPi is distributed in the hope that it will be useful,
* but WITHOUT ANY WARRANTY; without even the implied warranty of
* MERCHANTABILITY or FITNESS FOR A PARTICULAR PURPOSE. See the
* GNU General Public License for more details.* You should have received a copy of the GNU General Public License
* along with BrewPi. If not, see <http://www.gnu.org/licenses/>.
*/
?>
<div id="top-bar" class="ui-widget ui-widget-header ui-corner-all">
<div id="lcd" class="lcddisplay"><span class="lcd-text">
<span class="lcd-line" id="lcd-line-0">Live LCD waiting</span>
<span class="lcd-line" id="lcd-line-1">for update from</span>
<span class="lcd-line" id="lcd-line-2">script...</span>
<span class="lcd-line" id="lcd-line-3"></span>
</div>
<div id="logo-container">
<img src="brewpi_logo.png">
<div id=beer-name-container>
<span>Fermenting: </span><span><?php echo urldecode($beerName);?></span>
<span class="data-logging-state"></span>
</div>
</div>
</div>
<div class="chart-container">
<div id="curr-beer-chart-label" class="beer-chart-label"></div>
<div id="curr-beer-chart" class="beer-chart" style="width:815px; height:390px"></div>
<div id="curr-beer-chart-controls" class="beer-chart-controls" style="display: none">
<div id="curr-beer-chart-buttons" class="beer-chart-buttons">
<div class="beer-chart-legend-row">
<button class="refresh-curr-beer-chart" title="Refresh"></button>
<div class="beer-chart-legend-label">Refresh Chart</div>
<br class="crystal" />
</div>
<div class="beer-chart-legend-row last">
<button class="chart-help" title="Help"></button>
<div class="beer-chart-legend-label">Help</div>
<br class="crystal" />
</div>
</div>
<div id="curr-beer-chart-legend" class="beer-chart-legend">
<div class="beer-chart-legend-row time">
<div class="beer-chart-legend-time">Date/Time</div>
</div>
<div class="beer-chart-legend-row beerTemp">
<div class="toggle beerTemp" onClick="toggleLine(this)"></div>
<div class="beer-chart-legend-label" onClick="toggleLine(this)">Beer Temp</div>
<div class="beer-chart-legend-value">--</div>
<br class="crystal" />
</div>
<div class="beer-chart-legend-row beerSet">
<div class="toggle beerSet" onClick="toggleLine(this)"></div>
<div class="beer-chart-legend-label" onClick="toggleLine(this)">Beer Setting</div>
<div class="beer-chart-legend-value">--</div>
<br class="crystal" />
</div>
<div class="beer-chart-legend-row fridgeTemp">
<div class="toggle fridgeTemp" onClick="toggleLine(this)"></div>
<div class="beer-chart-legend-label" onClick="toggleLine(this)">Fridge Temp</div>
<div class="beer-chart-legend-value">--</div>
<br class="crystal" />
</div>
<div class="beer-chart-legend-row fridgeSet">
<div class="toggle fridgeSet" onClick="toggleLine(this)"></div>
<div class="beer-chart-legend-label" onClick="toggleLine(this)">Fridge Setting</div>
<div class="beer-chart-legend-value">--</div>
<br class="crystal" />
</div>
<div class="beer-chart-legend-row roomTemp">
<div class="toggle roomTemp" onClick="toggleLine(this)"></div>
<div class="beer-chart-legend-label" onClick="toggleLine(this)">Room Temp</div>
<div class="beer-chart-legend-value">--</div>
<br class="crystal" />
</div>
<div class="beer-chart-legend-row state">
<div class="state-indicator"></div>
<div class="beer-chart-legend-label"></div>
<br class="crystal" />
</div>
<div class="beer-chart-legend-row annotation last">
<div class="toggleAnnotations dygraphDefaultAnnotation" onClick="toggleAnnotations(this)">A</div>
<div class="beer-chart-legend-label" onClick="toggleAnnotations(this)">Annotations</div>
<br class="crystal" />
</div>
</div>
</div>
</div>
<div id="chart-help-popup" title="Beer graph help" style="display: none">
<p>This chart displays all temperatures and state information logged by BrewPi.
Not all temperatures are shown by default, but you can toggle them with the colored dots.</p>
<p>Click and drag left or right to zoom horizontally, click and drag up or down to zoom vertically. Double click to zoom out.
When zoomed in, you can hold shift to pan around. On your phone or tablet you can just pinch to zoom.</p>
<p>The state information is shown as colored bars at the bottom of the graph, explanation below.</p>
<div class="state-info"><span class="state-color state-idle"></span><span class="state-name">Idle</span>
<span class="state-explanation">
No actuator is active.
</span>
</div>
<div class="state-info">
<span class="state-color state-cooling"></span><span class="state-name">Cooling</span>
<span class="state-explanation">
The fridge is cooling!
</span>
</div>
<div class="state-info"><span class="state-color state-heating"></span><span class="state-name">Heating</span>
<span class="state-explanation">
The heater is heating!
</span>
</div>
<div class="state-info"><span class="state-color state-waiting-to-cool"></span><span class="state-name">Waiting to cool</span>
<span class="state-explanation">
The fridge is waiting to start cooling. It has to wait because BrewPi has just cooled or heated. There is a a minimum time for between cool cycles and a minimum time for switching from heating to cooling.
</span>
</div>
<div class="state-info"><span class="state-color state-waiting-to-heat"></span><span class="state-name">Waiting to heat</span>
<span class="state-explanation">
Idem for heating. There is a a minimum time for between heat cycles and a minimum time for switching from cooling to heating.
</span>
</div>
<div class="state-info"><span class="state-color state-cooling-min-time"></span><span class="state-name">Cooling minimum time</span>
<span class="state-explanation">
There is a minimum on time for each cool cycle. When the fridge hits target but has not cooled the minimum time, it will continue cooling until the minimum time has passed.
</span>
</div>
<div class="state-info"><span class="state-color state-heating-min-time"></span><span class="state-name">Heating minimum time</span>
<span class="state-explanation">
There is a minimum on time for each heat cycle too. When the fridge hits target but has not heated the minimum time, it will continue heating until the minimum time has passed.
</span>
</div>
<div class="state-info"><span class="state-color state-waiting-peak"></span><span class="state-name">Waiting for peak detect</span>
<span class="state-explanation">
BrewPi estimates fridge temperature overshoot to be able to turn off the actuators early. To adjust the estimators, it has to detect the peaks in fridge temperature.
When BrewPi would be allowed to heat/cool by the time limits but no peak has been detected yet for previous cycle, it waits in this state for a peak.
</span>
</div>
</div>
sudo nano PublicBeerPanel.phpThis will create a shell to copy/paste into.- Paste the code you copied above…and WAIT! NOTE: it will take a few seconds for the data to transfer, you should wait to see a “</div>” at the very bottom before moving onto the next step. This time it may take UP TO 3 MINUTES, be patient.
- Once you see “</div> </div>” Press CTRL+X
- Press Y
- Press Enter
- Copy the code on the following page (here is a link to file with just the text)
- We need to create 2 configuration files that the webserver will use to point to each service (BrewPi and Raspberry Pints)
cd /etc/apache2/sites-available cp 000-default.conf BrewPi.confcp 000-default.conf RaspPints.conf- If you type the
lscommand you should see 4 configuration files:- 000-default.conf
- default-ssl.conf
- BrewPi.conf
- RaspPints.conf
Password Protection for the BrewPi Admin Area
- Make sure you are still working in the following directory:
cd /etc/apache2/sites-available - Copy the following code:
ServerAdmin webmaster@localhost DocumentRoot /var/www/html/BrewPi<Directory /> Options FollowSymLinks AllowOverride None </Directory> <Directory /var/www/html/BrewPi> DirectoryIndex index.php Options Indexes FollowSymLinks MultiViews AllowOverride All Order allow,deny allow from all </Directory> - Open the BrewPi configuration file to edit it
sudo nano BrewPi.conf - Paste the contents from the code you copied over the existing data from “ServerAdmin” to “allow from all </Directory>.
- Press CTRL+X
- Press Y
- Press Enter
- Now you have to restart the Apache service
cd /usr/sbinsudo apache2ctl -k gracefulA text prompt will appear stating “Could not reliably determine server’s fully qualified name. Don’t worry everything is ok.
- Go back into your BrewPi directory so we can add additional files
cd /var/www/html/BrewPi sudo nano .htaccessThis creates a container for the necessary code.- Copy the following code:
<FilesMatch "admin.php"> Allow from all authuserFile /var/www/html/BrewPi/private/.htpasswd AuthName "YOUR USERNAME HERE" AuthType Basic <Limit GET POST> require valid-user </Limit> </FilesMatch> <FilesMatch "beer-panel.php|config.php|configuration.php|control-panel.php|maintenance-panel.php|previous_beers.php|program_arduino.php|s ave_beer_profile.php|start_script.php"> Order deny,allow Deny from All Allow from 192.168.1. </FilesMatch>- change “YOUR USERNAME HERE to any username you like (it is case-sensitive)
- change “192.168.1.” to your matching IP scheme (more than likely this will be ok). This statement means that any computer requesting the webpage where the ip address starts with 192.168.1.x will be able to access you file without requiring permissions (this may not work in future versions/updates therefor requiring all users to enter username/password).
sudo mkdir privateThis creates a folder to store our password file into.cd /privateThis moves us into the “private” folder.- Now we will set a password for that file to use
sudo htpasswd -c .htpasswd <username>
Where <username> is the name you input into the file above
- it will prompt you to enter a password, input password and press enter
- re-enter the same password and press enter
- Verify the pages were created correctly
- Public Page
http://192.168.1.12/BrewPiyou shouldn’t see any control buttons. - Admin Page
http://192.168.1.12/BrewPi/admin.phpyou should see controls and have the ability to edit items.
- Public Page
Setting up Static wlan0 (wifi) ip address
This must be completed if you will only use wifi (wlan0) and want to access your Raspberry Pi using port forwarding from an external network/internet connection.
New RaspPi users may have an issue remotely (outside of LAN) accessing a wifi ONLY BrewPi Server (i.e. not ethernet cable connected). This is because external port forwarding from many routers will have a difficult time forwarding correctly (from external …no issue if within LAN or using VPN).
seems that eternal port forwarding (without ethernet, eth0, connected, REQUIRES the implementation of the static IP to be hard coded (i.e. not via GUI):
static ip_address=192.168.1.XX
SOLUTION:
ssh into your RaspPi (or open a new terminal if your are on your Raspberry Pi):
sudo ssh pi@192.168.1.xcd /etc/sudo nano dhcpcd.confscroll to the bottom of the dhcpcd.conf file and add the the following line:-
# Custom static IP address for wlan0. interface wlan0 static ip_address=192.168.1.12/24 static routers=192.168.1.1 static domain_name_servers=192.168.1.1 - Press CTRL+X
- Press Y
- Press Enter
where 192.168.1.XX is your RaspPi ‘s static IP for the wlan0 (wifi adapter). I would recommend also adding an IP reservation to your router OR place the RaspPi’s wifi IP outside the dhcp range on your router.
The GUI assignment of defining an IP does NOT make it static…and in turn will not allow your router to port forward to the wlan adapter
Server access by port number (Port Forwarding Setup)
Route Traffic Based on Ports
You can also setup your Raspberry Pi to listen and route traffic based on ports. Lets say for example you want the following:
- BrewPi will listen on port 8080
- Raspberry Pints will listen on port 8085This would mean if you typed in http://192.168.1.12:8085 you would be routed to the RaspberryPints server. Whereas http://192.168.1.12:8080 would be routed to the BrewPi server.
- We need to edit our apache2 files
sudo nano /etc/apache2/ports.conf
This will open the ports configuration file.
- We need to change the default port and add code to listen to a second port. Your code should look like this (black text):
# If you just change the port or add more ports here, you will likely also # have to change the VirtualHost statement in # /etc/apache2/sites-enabled/000-default.confListen 80<IfModule ssl_module> Listen 443 </IfModule><IfModule mod_gnutls.c> Listen 443 </IfModule># vim: syntax=apache ts=4 sw=4 sts=4 sr noet- first we need to delete the “Listen 80”
- next add in the 2 new “NameVirtualHost” and their ports
- your new file should look like this:
# If you just change the port or add more ports here, you will likely also
# have to change the VirtualHost statement in
# /etc/apache2/sites-enabled/000-default.confNameVirtualHost *:8080
Listen 8080NameVirtualHost *:8085
Listen 8085<IfModule ssl_module>
Listen 443
</IfModule><IfModule mod_gnutls.c>
Listen 443
</IfModule># vim: syntax=apache ts=4 sw=4 sts=4 sr noet
In order to get Apache to get work correctly we will setup the configuration files we setup earlier ( in the directory /etc/apache/sites-enabled). Apache uses these files as possible
- First go to the sites-enabled directory
cd /etc/apache2/sites-available- List the folder’s contents by typing
ls
- Edit the BrewPi configuration file
sudo nano BrewPi.conf- Change <VirtualHost *:80> to <VirtualHost *:8080>
- Press CTRL+X
- Press Y
- Press Enter
- Edit the RaspPints configuration file
sudo nano RaspPints.conf- Change <VirtualHost *:80> to <VirtualHost *:8085>
- Update the “DocumentRoot from /var/www/html” to
“DocumentRoot /var/www/html/RaspPints” - Press CTRL+X
- Press Y
- Press Enter
- Now we have to tell Apache to actually enable the available This is done my using the a2ensite command (if you mess up or need to remove an enabled site use the a2dissite command). The a2ensite command creates a symbolic link to the .conf file and makes the site active.
cd /etc/apache2/sites-availablesudo a2ensite BrewPi.confsudo a2ensite RaspPints.confsudo /etc/init.d/apache2 reload
- Verify the server behaves correctly
- BrewPi – Public Page
http://192.168.1.12:8080 - Brew Pi – Admin Page
http://192.168.1.12/BrewPi/admin.php - Raspberry Pints
http://192.168.1.12:8085
- BrewPi – Public Page
- Because of the changes we need to restart the Apache server
sudo /etc/init.d/apache2 reload
Router Port forwarding theory
This must be setup and enabled if you wish to access your Raspberry Pi from outside your network (i.e. from work or via cell etc.) It can usually be found under advanced options on your router. For this you will need to know your router’s ip address.
Most home users will have a router with an IP address of 192.168.1.1. If you don’t know how to access your router or setup port forwarding please Google and Search on YouTube for your specific router model and “port forwarding”.
Many ISPs block port 80 so you will more than likely have to setup internal and external ports if you wish to use the standard port 80. In our setup we used 2 external ports that had the same internal ports.
This means we forwarded traffic from your routers external IP address (not the 192.168.1.1 address) on port 8080 to your Raspberry Pi’s ip on port 8080.
- (external ip) x.x.x.x:8080 -to- 92.168.1.12:8080 (goes to BrewPi)
- (external ip) x.x.x.x:8085 -to- 192.168.1.12:8085 (goes to RaspPints)
There are many ways to setup your router and this topic is far to in depth to cover here.
Dynamic Domain Name Service (Dynamic DNS)
This is a service that you can subscribe to that (depending on your router) can automatically update your external ip address and route traffic based on a name versus having to remember your numeric ip address. Example:
Dyn is a company that offers the ability to remotely access your network using a website name vs. ip address (numeric). Their product info can be found here http://dyn.com/dns/
For example if you wanted your Dyn site name to be DigitalBrewer you would setup the following: http://digitalbrewer.dyndns.orgThis address would forward to your network. You must also specify a port however. This is because you need to let router know which computer you want the traffic to be routed to. In our case it would be
- http://digitalbrewer.dyndns.org:8080 for BrewPi (Public)
- http://digitalbrewer.dyndns.org:8080/admin.php for BrewPi (Admin)
- http://digitalbrewer.dyndns.org:8085 for Raspberry Pints
If you have a higher end router it should have the ability to login to a DDNS service. When logged in and enabled your router will update your DynDNS account to reflect your router’s current external IP address. This is important because most ISPs only provide home users dynamic ip addresses.
Changing the Default BrewPi password
This is for logging into (ssh user/pass). Currently it is
- Username: brewpi
- Password: brewpi
I highly recommend changing this so that no one could ever access your account and mess with files and in essence have access to your controller.
Automatic Updates
- To have your BrewPi update when a future version is released execute the following:
sudo ~/brewpi-tools/updater.py- You will be warned that you are in developer mode (branch) and that you should switch. Simply hit enter.
- Hit enter again to make Master you “checked out branch”
- You will be asked to type the path the BrewPi installation was installed in, enter:
/var/www/html/BrewPi - You will then be asked if you want this script to run automatically this is your choice…if you choose yes or hit enter there is a chance it could update something that you edited to make you site remotely viewable. If you choose no you will have to manually update. I was comfortable choosing yes.
BrewPi Connection to Raspberry Pi
At this point everything is in order to directly connect the BrewPi spark v2 (via usb cable) to your Raspberry Pi. This will accomplish 2 things:
- Power the BrewPi Spark
- Provide the data connection so that the BrewPi can
- update data to the webserver
- receive commands from the web interface to
- add/enable devices
- adjust settings
- Add Devices
- Plug in temperature probes
- Click Maintenance Panel
- Click Device Configuration
- Place a check in the Read Values Click Refresh Devices
- Select a probe and enable
- When all have been added restart the Raspberry Pi (this should also restart the BrewPi controller).
BrewPi Settings for an FTSS & Glycol Chiller Setup
Set the room temp sensor to monitor the glycol temp.
A fridge sensor is not recommended. Without a fridge sensor, the fridge PIDs will take the input from the beer sensor as fallback.The recommended settings (from Elco, BrewPi developer):
Beer-to-Fridge: Kp=0, Td=0, Ti= 0. This will make the fridge setpoint the same as the beer setpoint.
Heater1: 4s period, Kp= 60, Ti=3600, Td=120
Cooler (pump): PWM period of 120s, 10s min ON time. Kp=10, Ti=3600, Td=120 - First go to the sites-enabled directory